Respond to a family public law order application on MyHMCTS
Updated 2 October 2024
1. Before you start
Before you can access public family law services using MyHMCTS, you and your organisation must have completed other steps:
- Set up HMCTS Payment by Account (so that you can pay any relevant fees)
- Registered your organisation with MyHMCTS
- Set up your MyHMCTS user account
Please read the MyHMCTS registration guidance for further information and instructions. If your organisation has an account already, contact the administrator to arrange for your account creation.
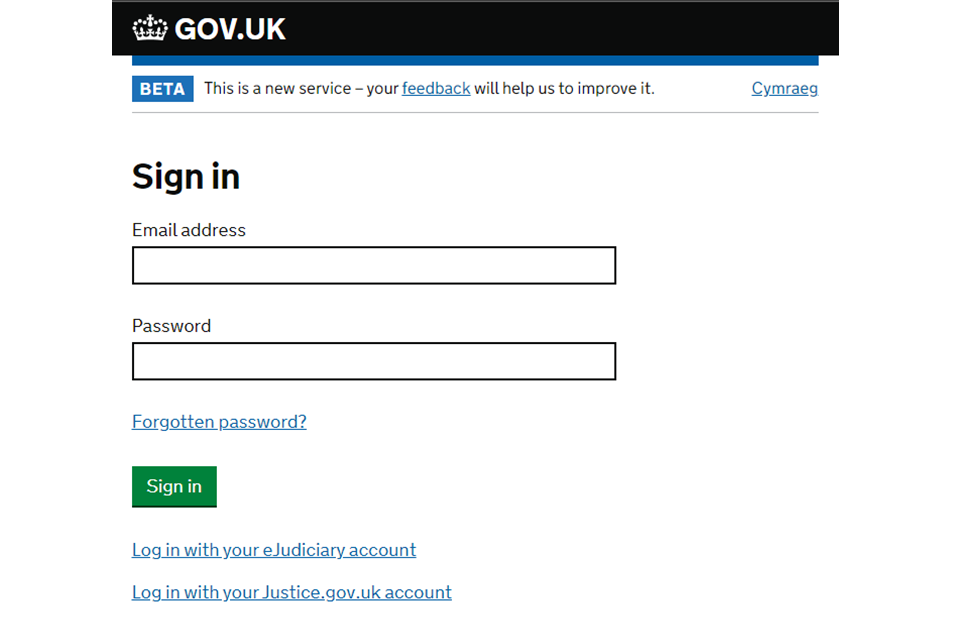
Once you have a MyHMCTS account, you can sign in using your email address and password.
The login web address is https://manage-case.platform.hmcts.net. If you use a browser bookmark, make sure this is the address stored in the bookmark and that it does not have added characters.
If you are nominated as the respondent solicitor but your case administrator cannot find the case, it means either:
- the case has not yet been served on you, or
- the applicant was not able to add your details to the case to give you digital access to the file
In these circumstances, file a notice of change to be added to the case.
Visit MyHMCTS: how to complete case administration tasks for guidance on case administration tasks, such as:
- sharing a case – including with barristers or other advocates
- assigning a case
- filing a notice of change or acting
Urgent applications
If you are applying outside of court hours but need the court to take action immediately, refer to your local urgent court or out of hours business process.
The out of hours service will not take payment, so you must then submit your application online and pay the relevant fee.
Your online submission will be consolidated with your out of hours application and updated retrospectively.
Case file view
How documents appear in case file view depends on when they were uploaded. Those uploaded:
- from 23 July 2024 will appear in reverse chronological order and display upload date and time
- before 23 July 2024 will appear in alphabetical order without the upload date and time
2. Sign in and find a case
1. Sign in to MyHMCTS with your account and password details.
2. You will see the home screen, known as the ‘Case List’. Use the filters to find and view applications that have been issued. You may need to reset the filters to find the case. If you still cannot see the case, contact your case administrator. If after that you are still having issues, contact us for help.
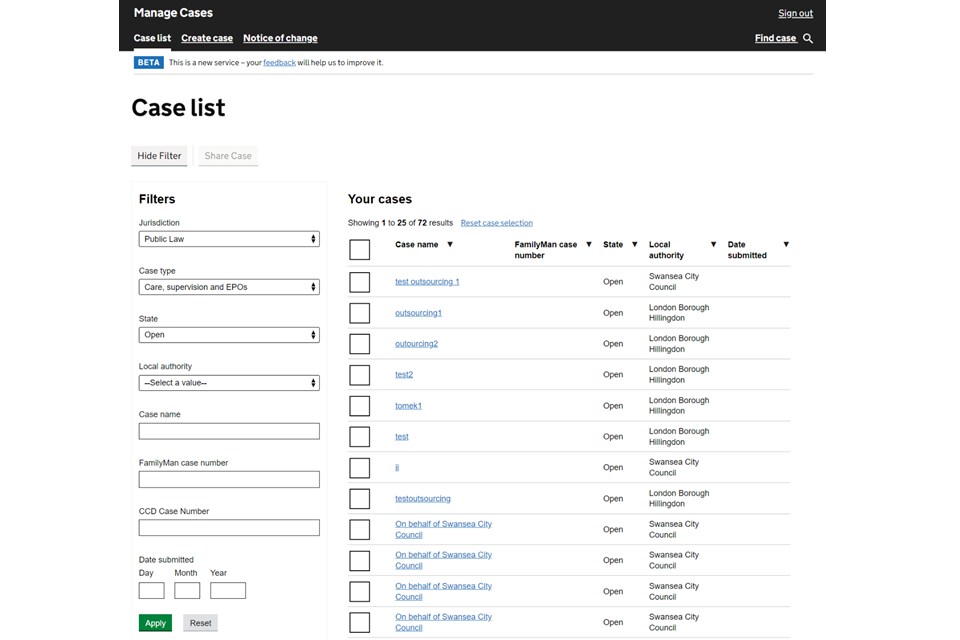
If you want to create a case, please read the guidance for how to apply for a family public law order.
3. Select the appropriate issued application to see the case management screen. The documents tab will be selected by default.
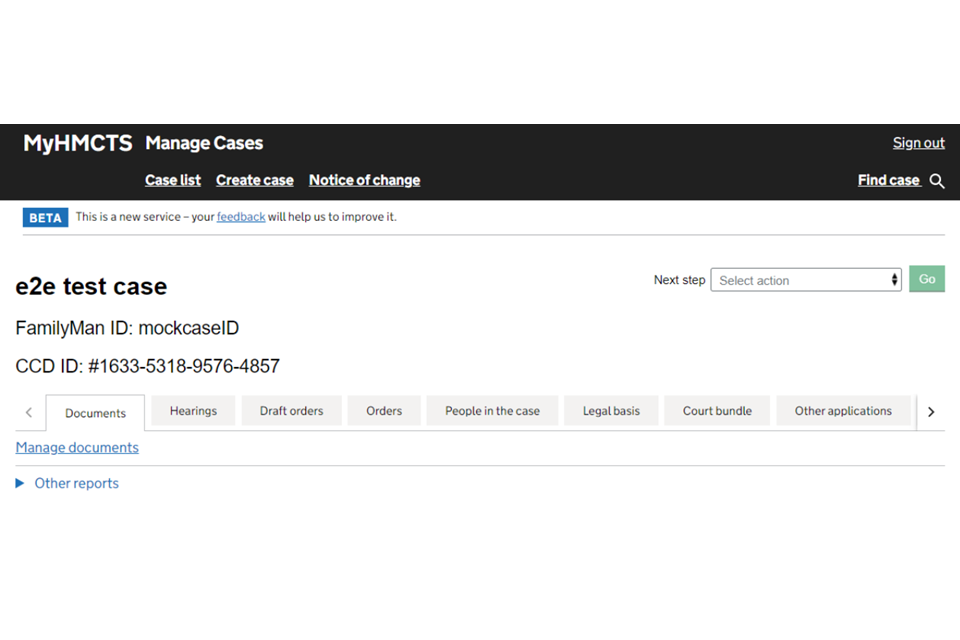
The tabs you see will include:
- Case file view – including statements, bundles and the C110a
- Hearings – all hearing details
- Draft orders – orders waiting for the judge to approve post hearing (will only show if there is a draft order to approve)
- Orders – approved orders (a notification will be sent when an order is approved)
- People in the case – details of each party in the case
- Legal basis – threshold criteria, allocation decisions and application summary
- Other applications – additional applications made within proceedings
3. Change a name on a case
If you represent the children or the respondent, you can change their name on a case if you need to.
1. Select either ‘Children’ or ‘Respondent’ in the next step dropdown and select ‘Go’.
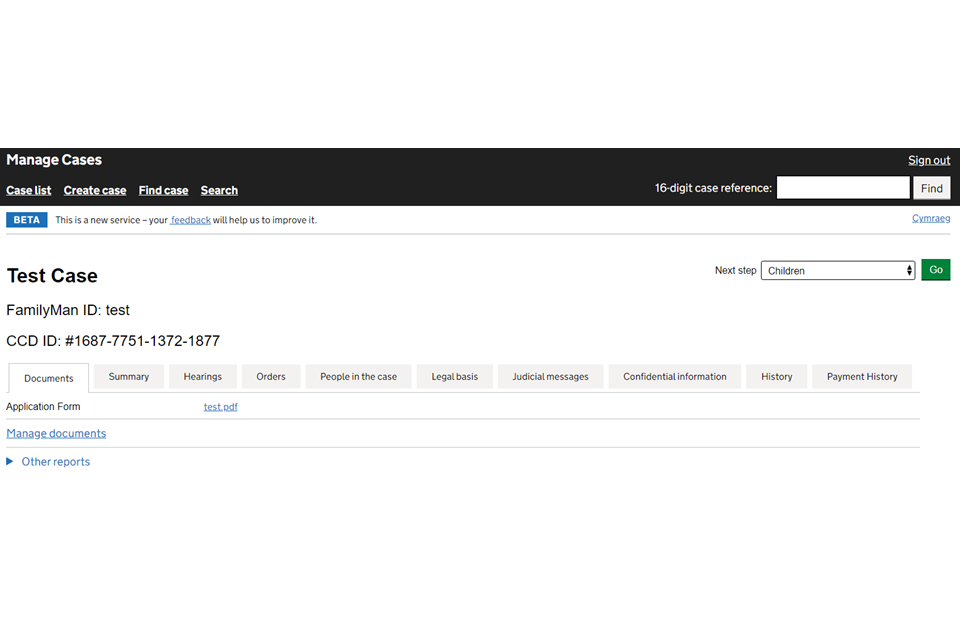
2. Enter the correct names in the ‘First name’ and ‘Last name’ boxes and select ‘Continue’.
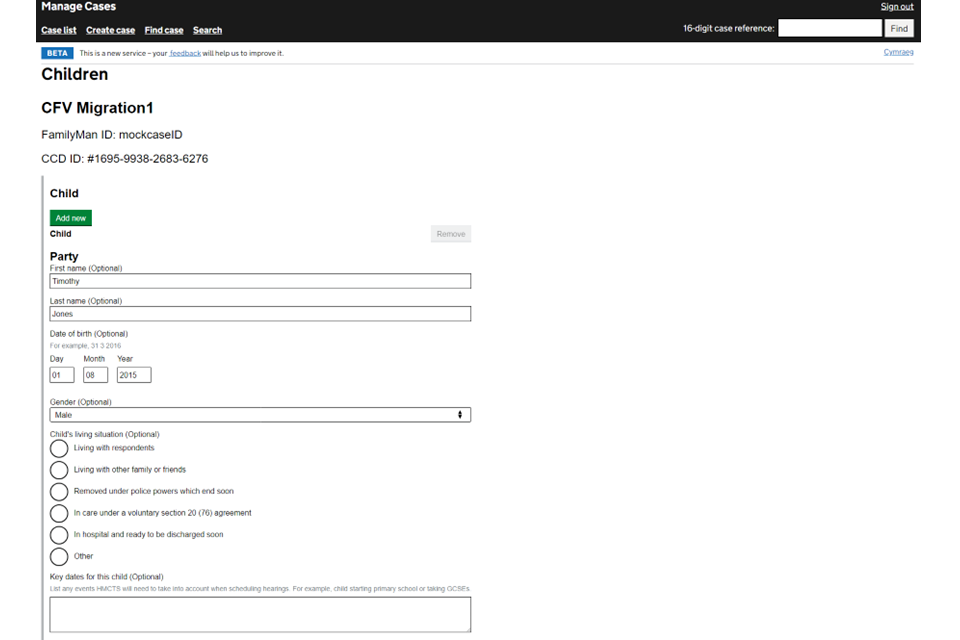
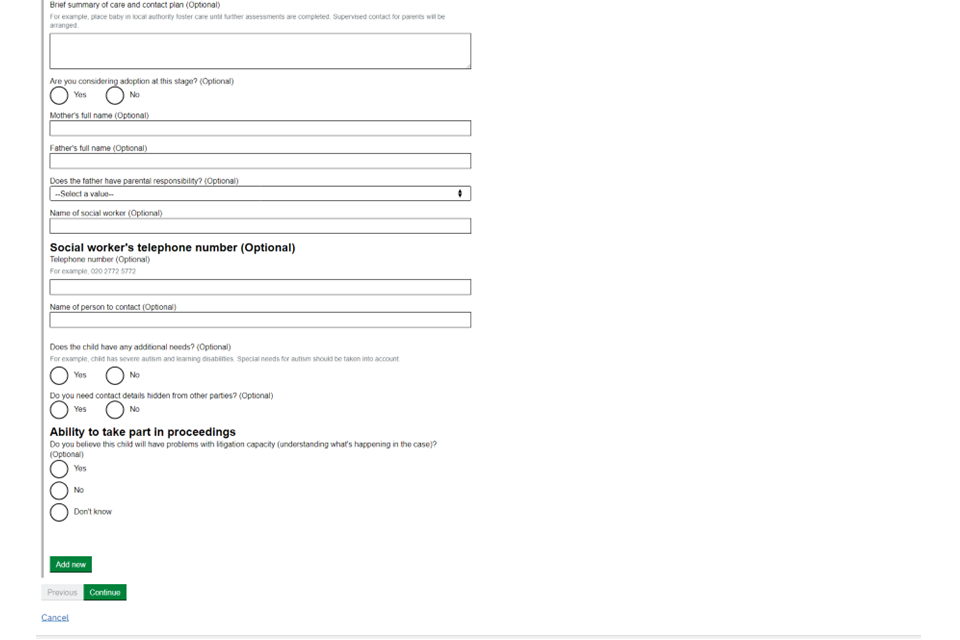
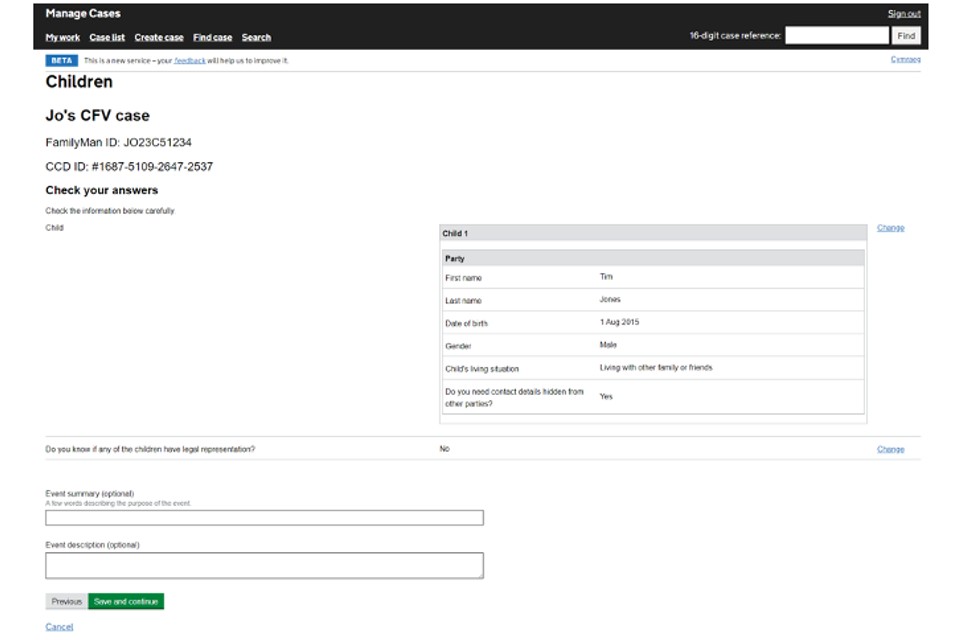
3. Check your answers. If the name is correct, select ‘Save and continue’.
4. Manage documents and orders
Upload a document
You must add all documents and orders to the case using MyHMCTS. Do not send any documents by email unless you have been asked to by a judge.
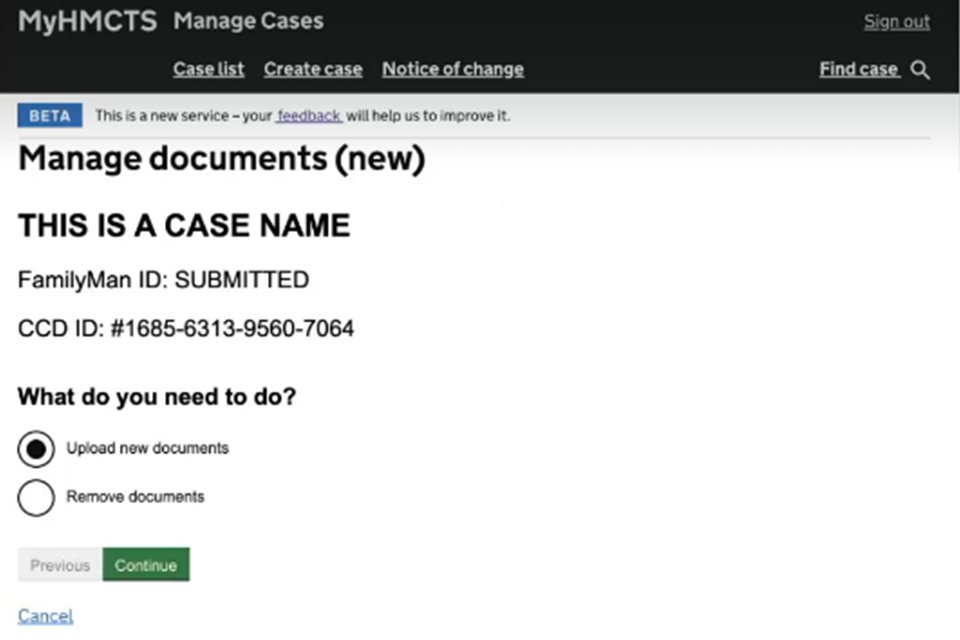
1. Select ‘Manage documents’ from the next step dropdown. Then select ‘Go’.
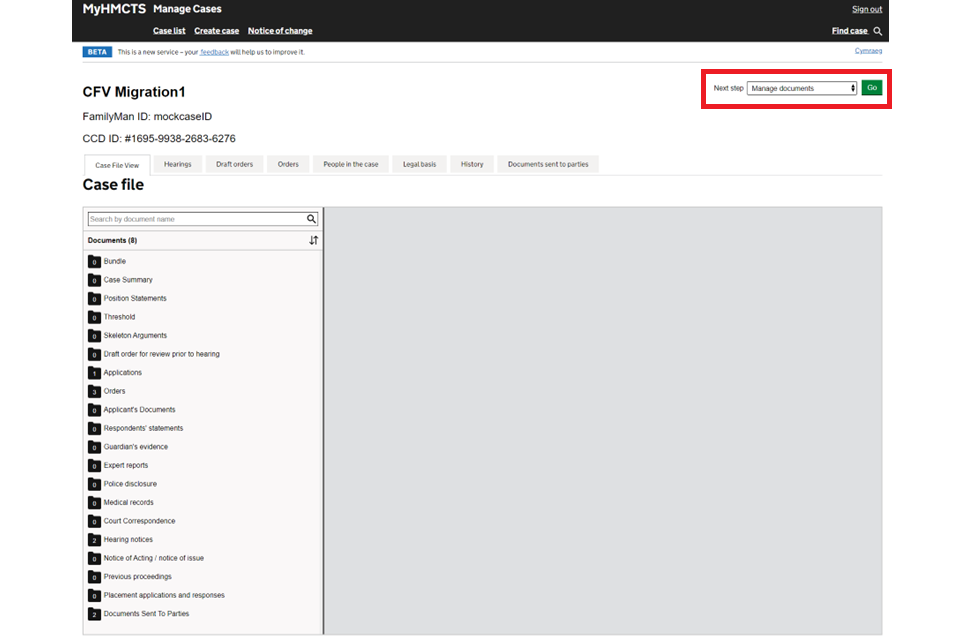
2. Select ‘Upload new documents’. Then select ‘Continue’.
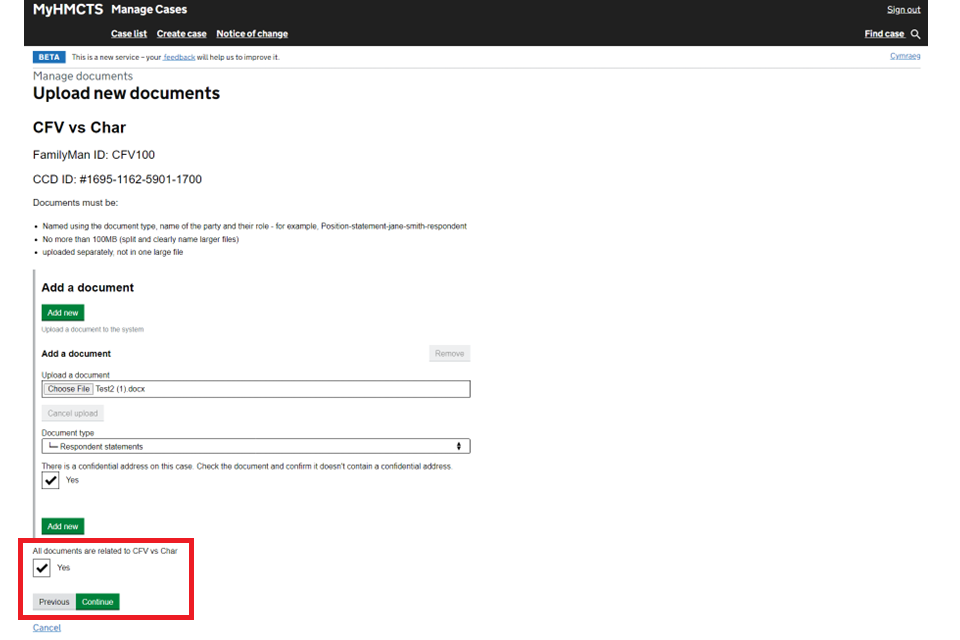
3. Select ‘Choose file’ and browse for the document. Then select document type from the dropdown list.
You should name the document with the document type, the name of the related person and the role of the related person. For example, Statement_John-Smith_Respondent1.
4. If there is a confidential address on the case, you will see a tick box asking you to check the document does not contain any. Make sure it does not then select ‘Yes’.
5. Check all documents are related to this case and select ‘Yes’. Then select ‘Continue’.
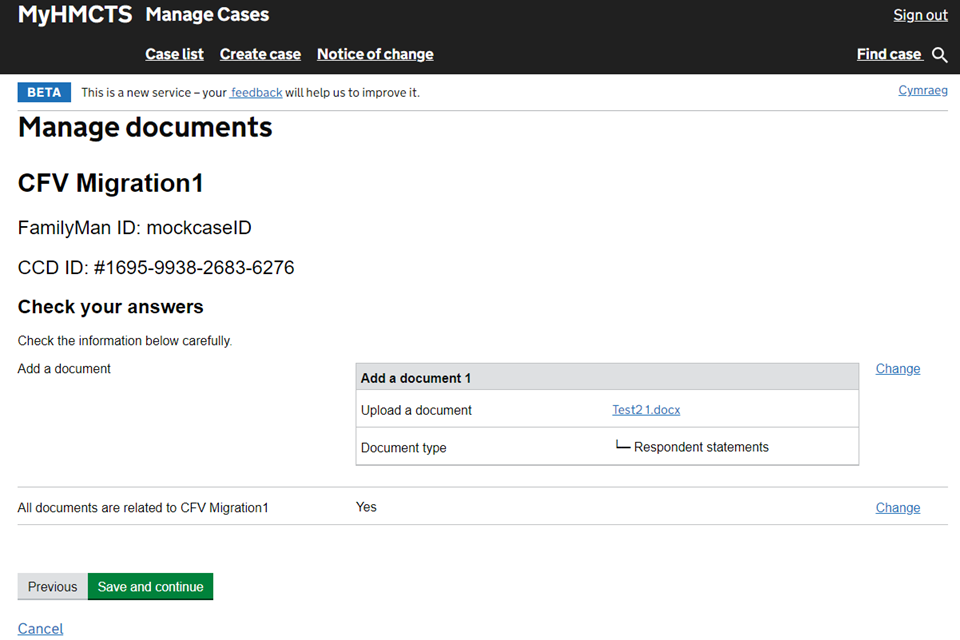
6. Check your answers. If they are correct, select ‘Save and continue’. The document will appear in the documents tab.
Remove a document
You can remove a document if you have uploaded it in error, no longer wish to add it to the case or want to replace it.
1. Select ‘Manage documents’ from the next step dropdown. Then select ‘Go’.

2. Select ‘Remove documents’. Then select ‘Continue’.
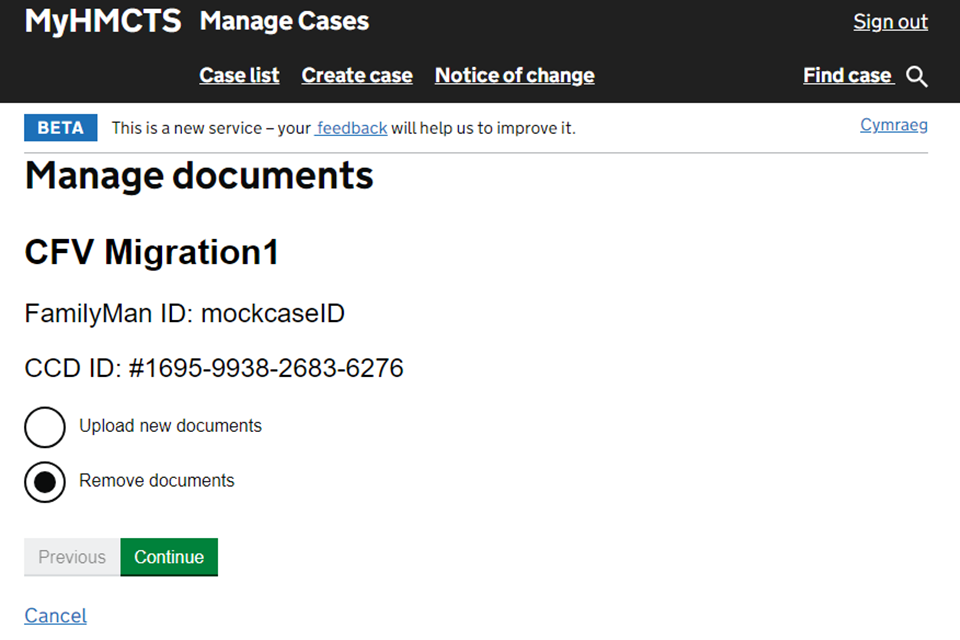
3. Select which document you wish to remove from the dropdown menu. Then select the reason and ‘Continue’.
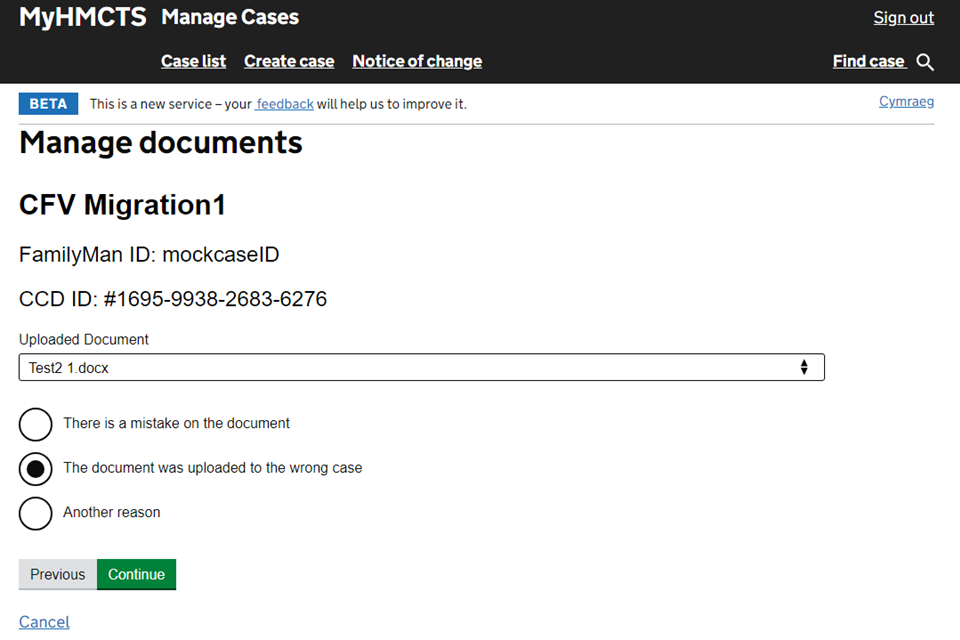
4. Check your answers are correct. Then select ‘Save and continue’.
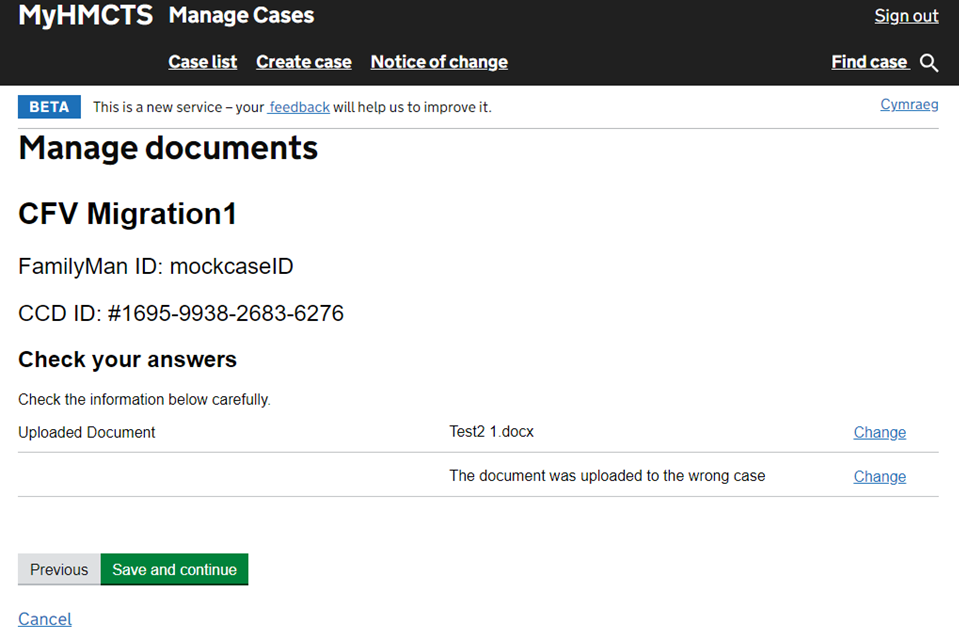
The document will no longer appear in the documents tab. If you need to replace the document, you should then upload the document using ‘manage documents’ and ‘upload document’.
Remove a draft order
1. Select ‘Remove draft orders’ from the next step dropdown menu. Then select ‘Go’.
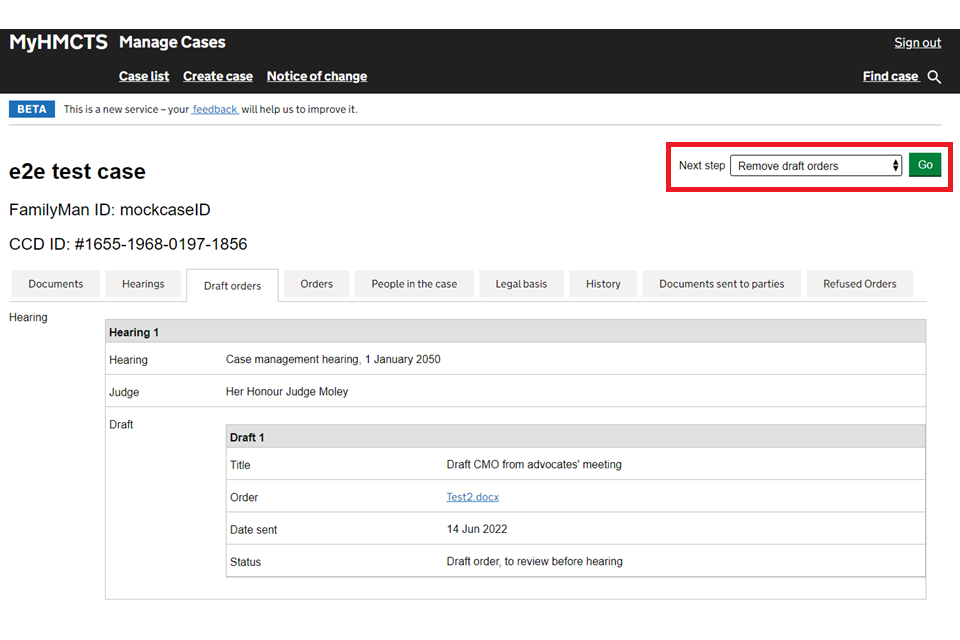
2. Choose the draft order you want to remove. Check it is the correct draft order if there is more than one. Select ‘Continue’.
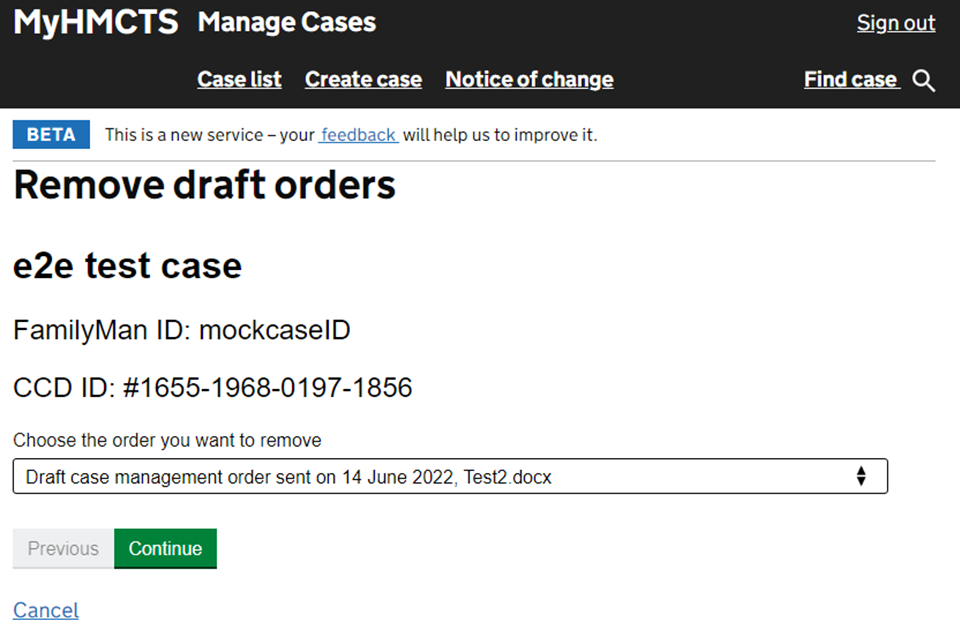
3. Explain why the order is being removed, then select ‘Continue’.
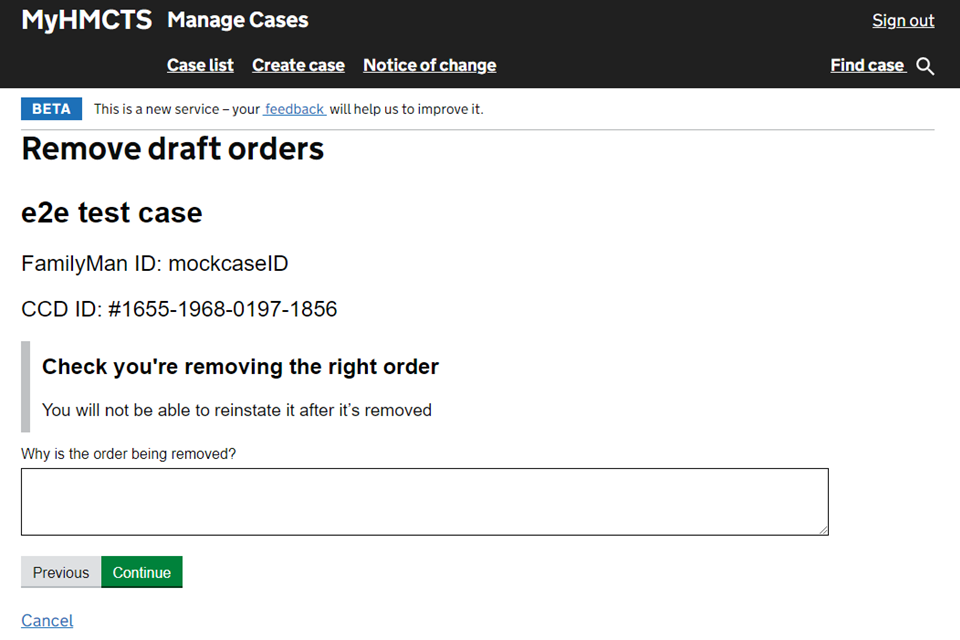
4. Check your answers are correct and select ‘Submit’.
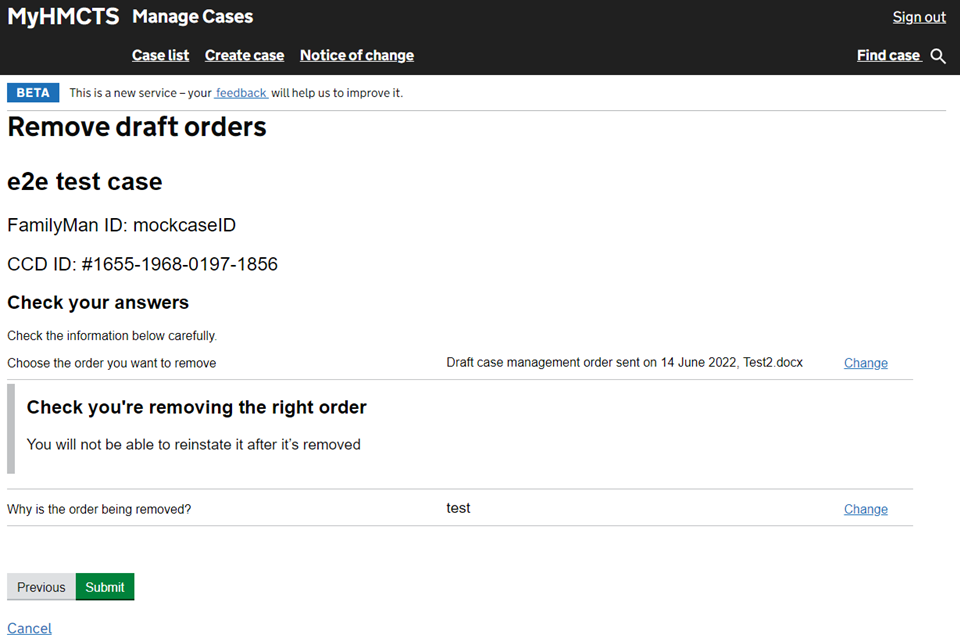
5. The order will no longer be in the draft order tab. The judge or legal adviser will be updated.
Upload a draft order before a hearing
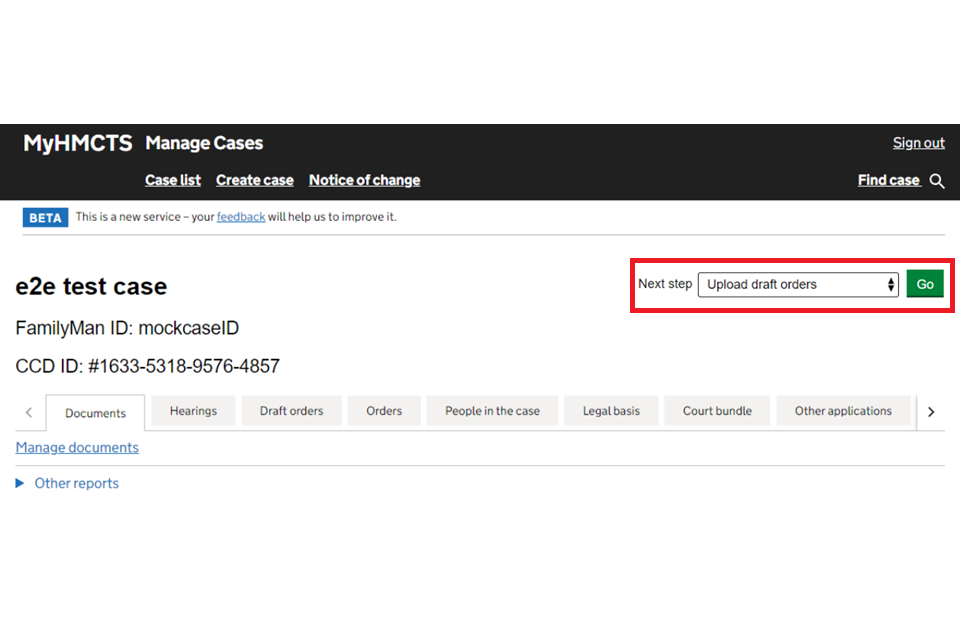
1. Select ‘Upload draft orders’ from the next step dropdown, then select ‘Go’.
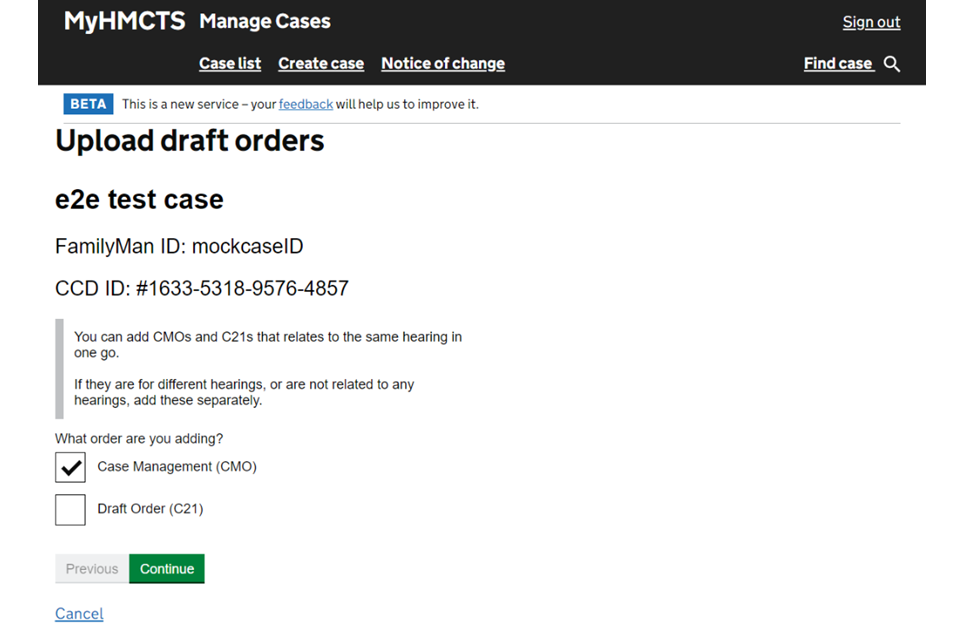
2. Select ‘Case Management (CMO)’ from the order options, then ‘Continue’.
3. Select ‘Draft CMO’ then choose which hearing the order relates to from the dropdown menu. Then select ‘Continue’.
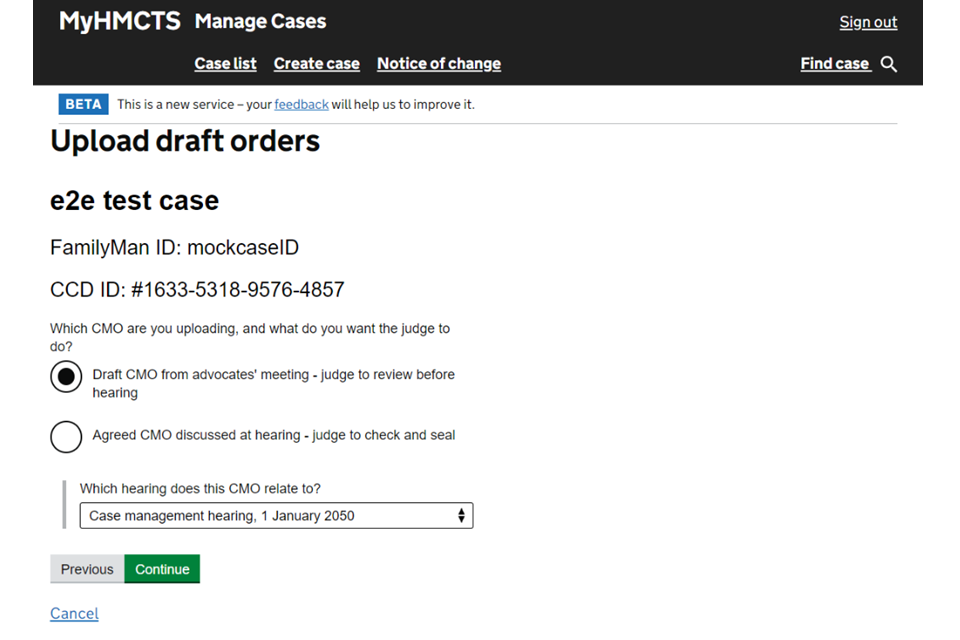
If the hearing is not listed, ask the court to add the hearing to the case so the order can be uploaded.
4. Browse for the file that you want to upload as the draft order – the file must be in Word format. Then select ‘Continue’.
In the CMO, include if you need:
- an intermediary at the hearing
- an interpreter at the hearing
- another respondent added to the case
- any other people affected by the outcome (intervenors)
- special measures or reasonable adjustments
Do not add additional orders in the ‘Case summary and supporting documents’ section – they cannot be approved if uploaded here.
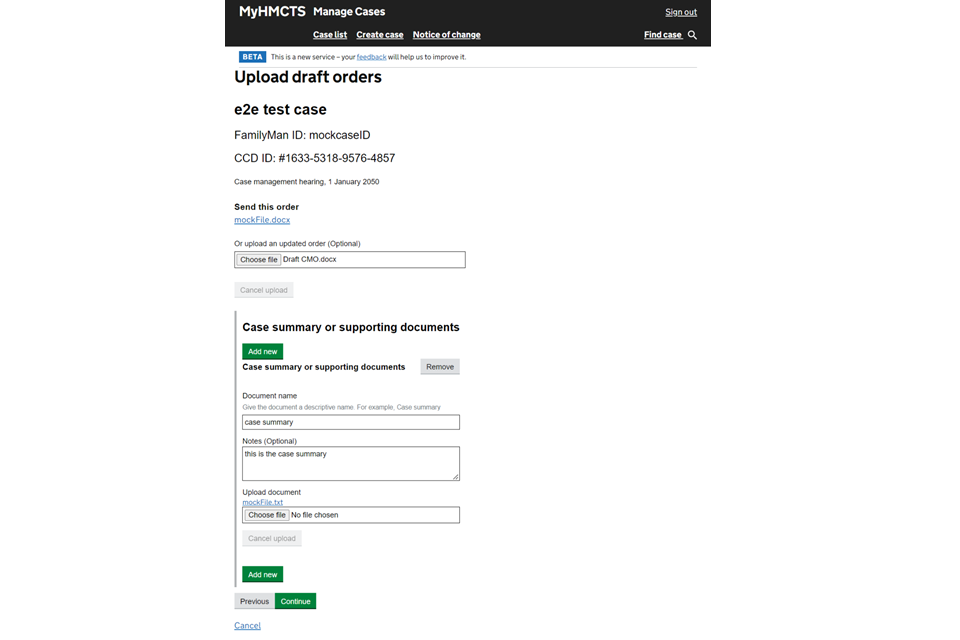
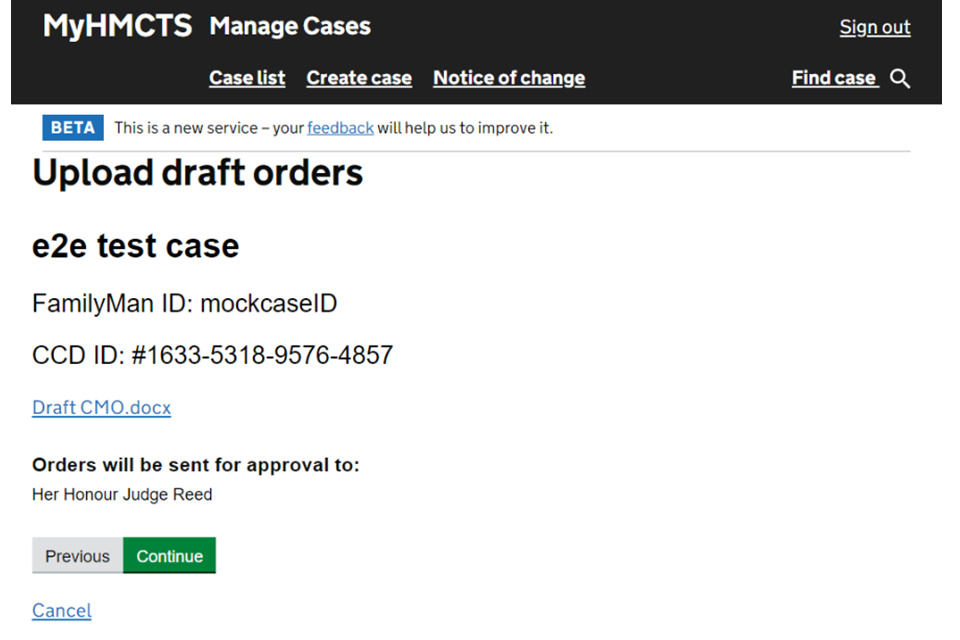
5. The next screen will show the name of the judge that the order will be sent to for approval. Select ‘Continue’.
6. Check your answers are correct. If you need to amend any of the details, select ‘Change’ next to the appropriate detail. When all the answers are correct, select ‘Submit’.
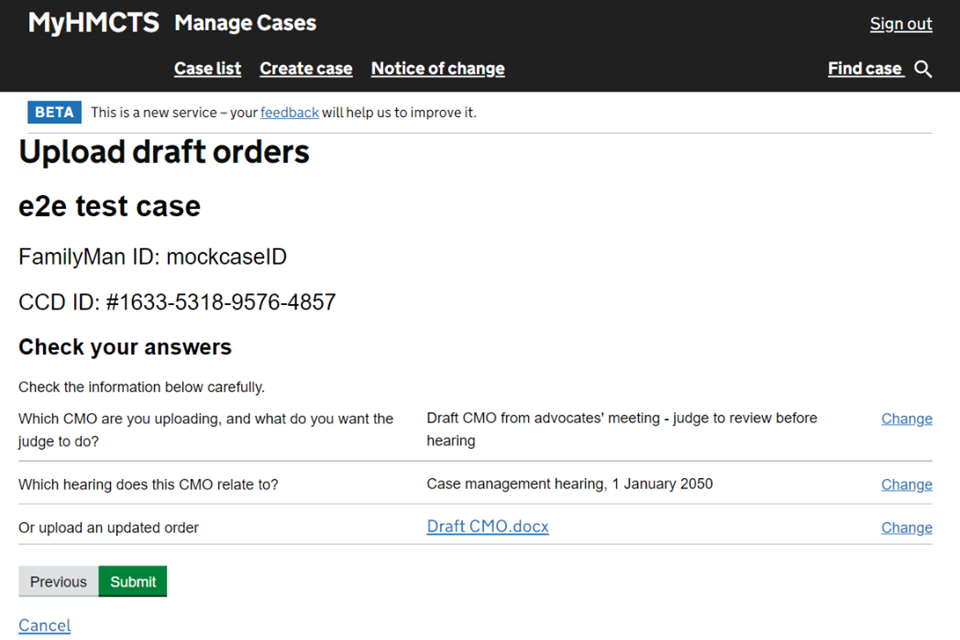
The hearing judge will receive a notification that the draft order is available to view in the hearing documents tab. This is not the order they will approve.
Upload an agreed order for a judge to approve
1. Select ‘Upload draft orders’ from the next step dropdown, then select ‘Go’.
2. Select the relevant order option. If you have more than one order relating to the same hearing, select both options – for example, if you want to upload a police disclosure order.
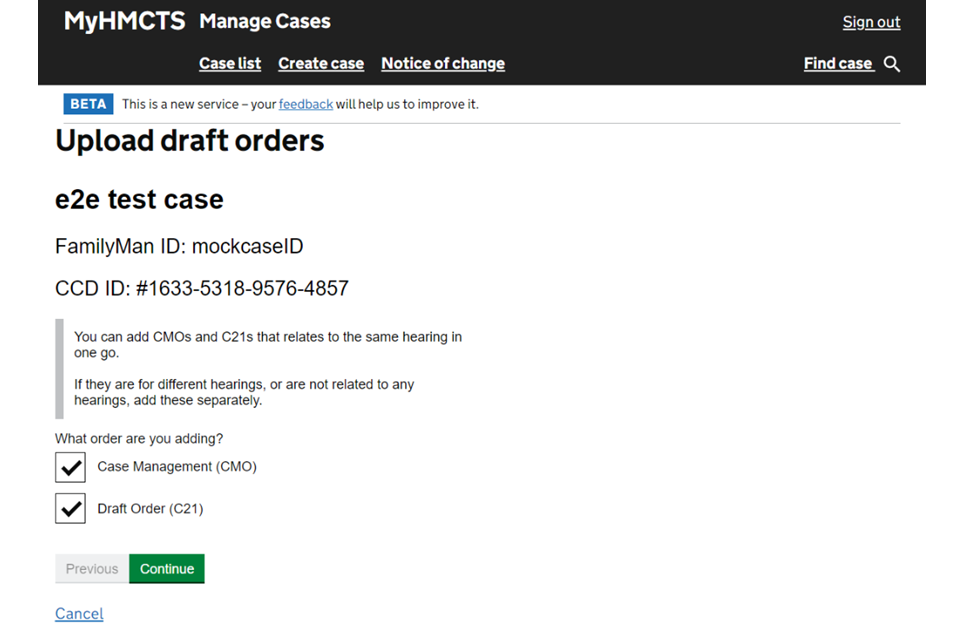
3. Select ‘Agreed CMO’ then choose which hearing the order relates to from the dropdown menu. Then select ‘Continue’.
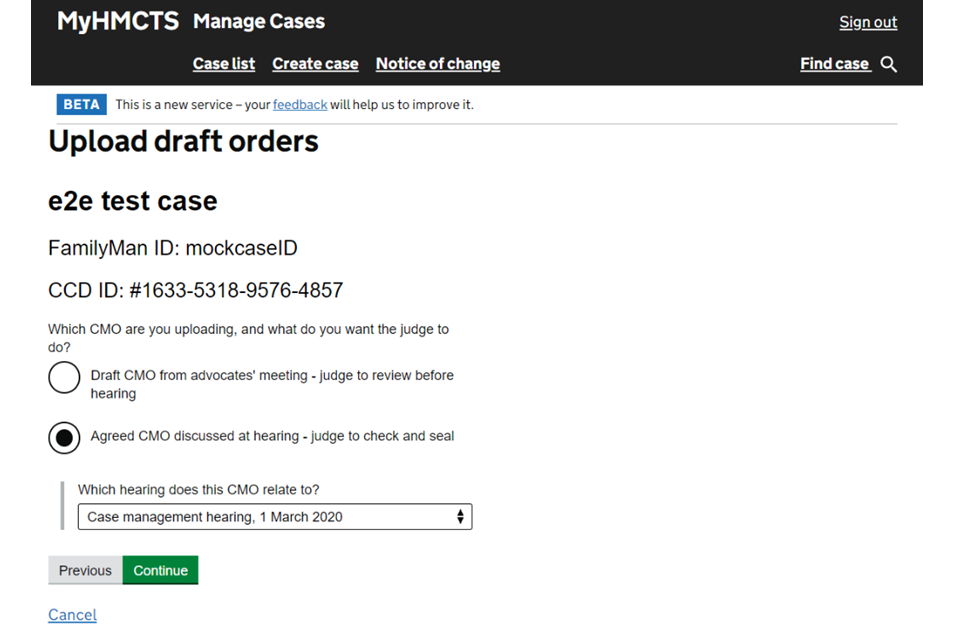
If the hearing is not listed, ask the court to add the hearing to the case so the order can be uploaded.
4. Browse for the file that you want to upload as the agreed order. Make sure the file is named ‘Final order’ not ‘Draft order’. Then select ‘Continue’.
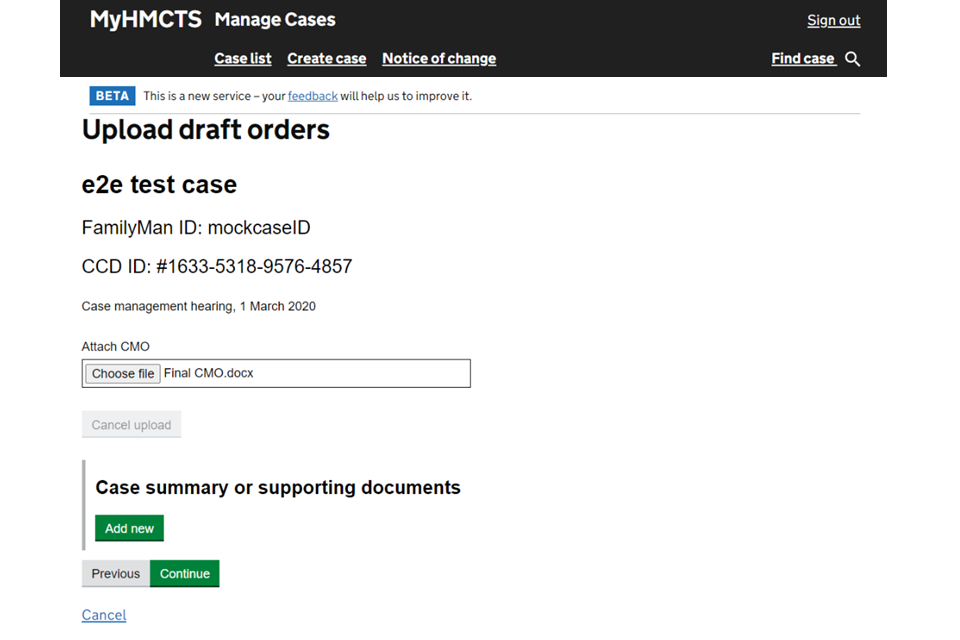
If you are adding a case summary, you should upload this by 4pm on the last working day before the hearing unless ordered otherwise.
Do not add additional orders to the ‘Case summary or supporting documents’ section. You can add additional orders on the next screen.
5. Name and browse for an additional order, such as a police disclosure order. When you have added all the additional orders, select ‘Continue’.
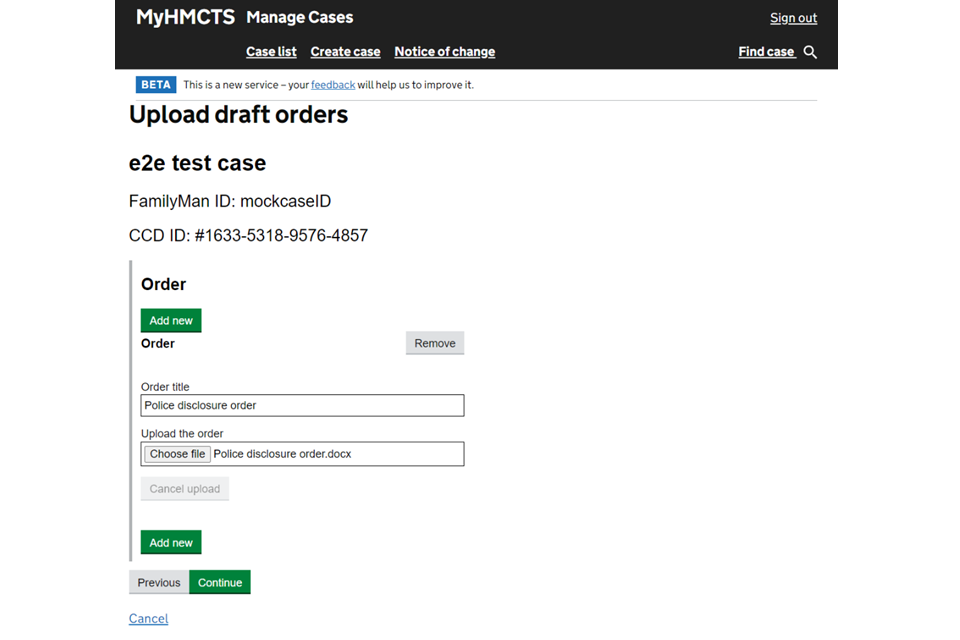
6. The next screen will show the name of the judge that the order(s) will be sent to for approval. Select ‘Continue’.
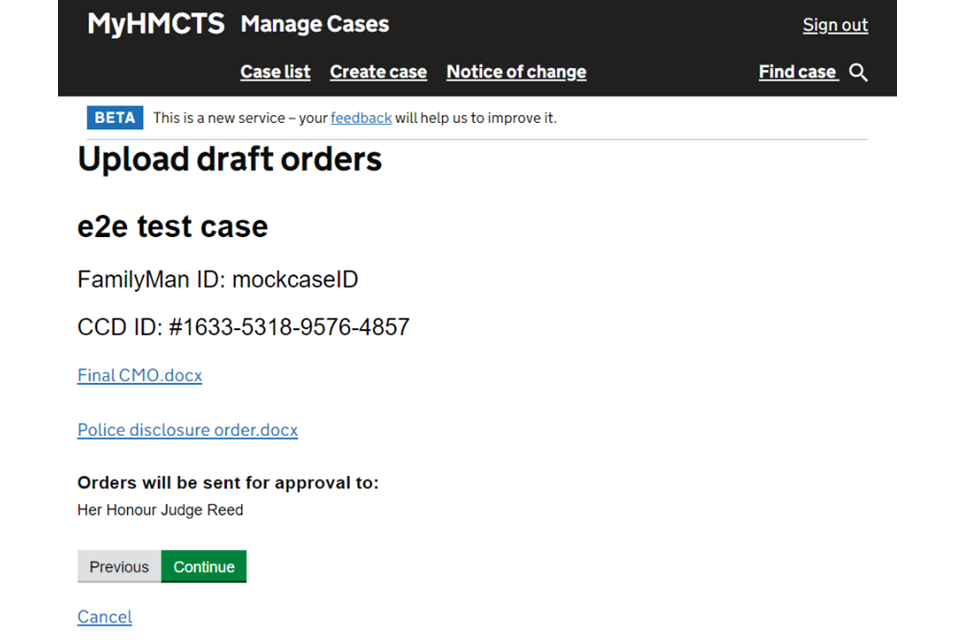
7. Check your answers are correct. If you need to amend any of the details, select ‘Change’ next to the appropriate detail. When all the answers are correct, select ‘Submit’.
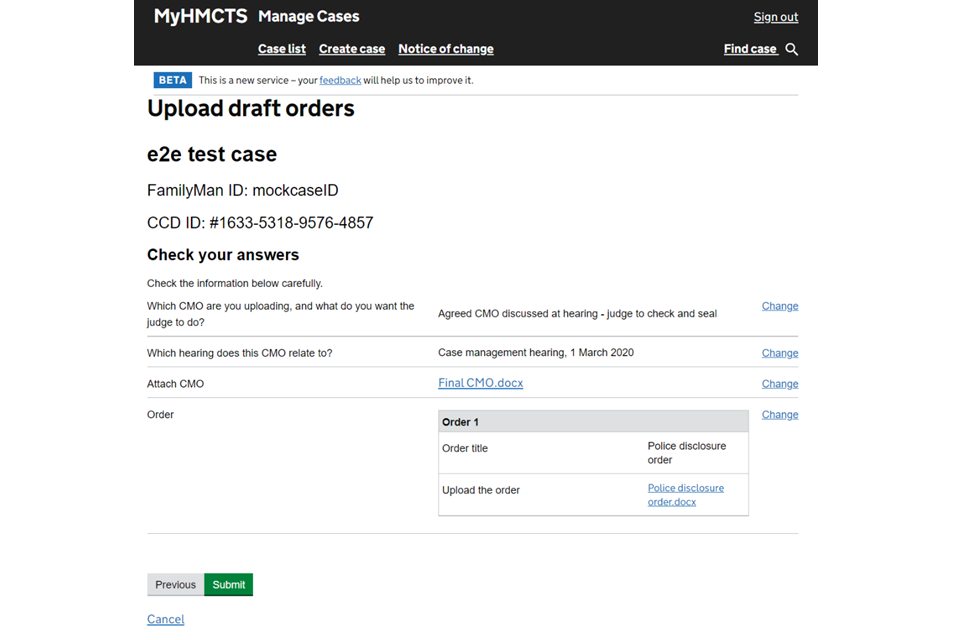
The hearing judge will receive a notification that the agreed order(s) is available to view.
5. Make an additional application
You can make an application for additional orders or provisions to be made in the case.
If the application is confidential and not to be made available to the other parties, you must send it to the court on paper rather than on MyHMCTS – for example, in public interest immunity (PII) cases or highly sensitive cases where the other parties should not be notified.
You can email any applications by third parties, including the police or intervenors, to contactfpl@justice.gov.uk to process.
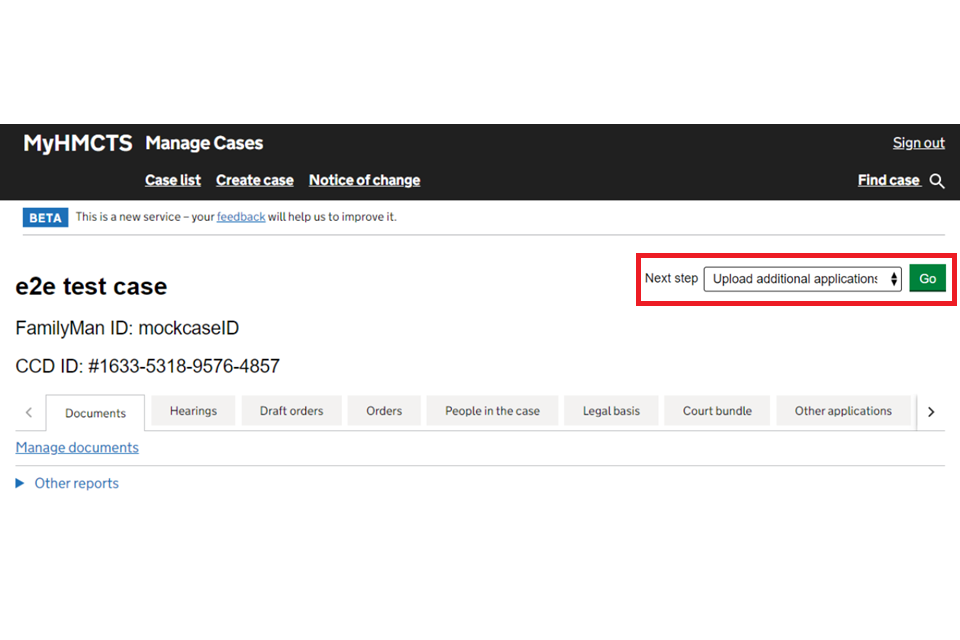
1. Select ‘Upload additional application’ from the next step dropdown. Then select ‘Go’.
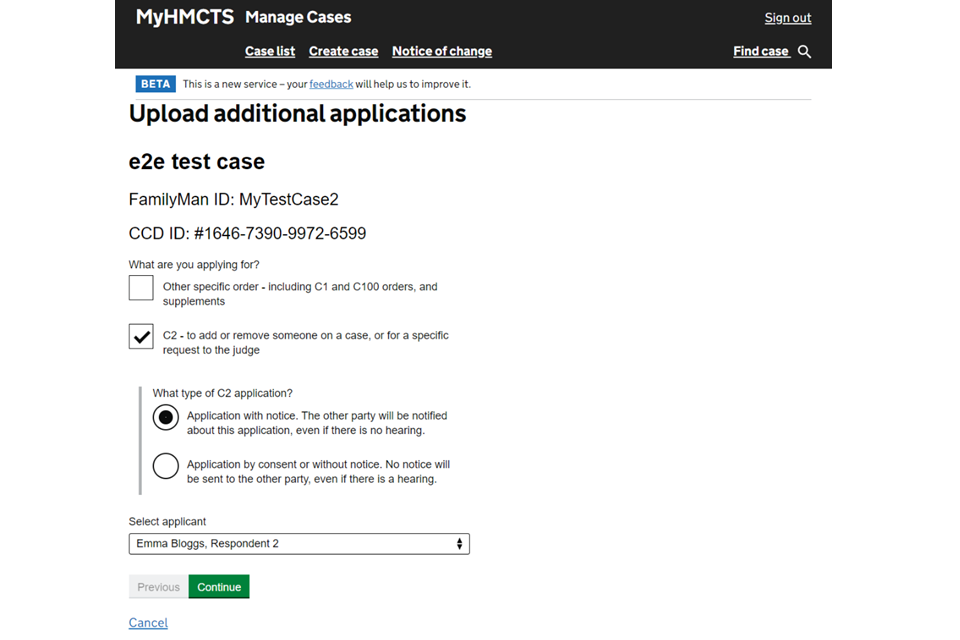
2. Select the type of application. If you are making a C2 application to add or remove someone on a case, state whether it is by consent or without notice. Then select the relevant applicant from the dropdown menu and ‘Continue’.
If you have selected ‘Other specific order’, go to step 4. If you have selected a C2 application or both options, go to the next step.
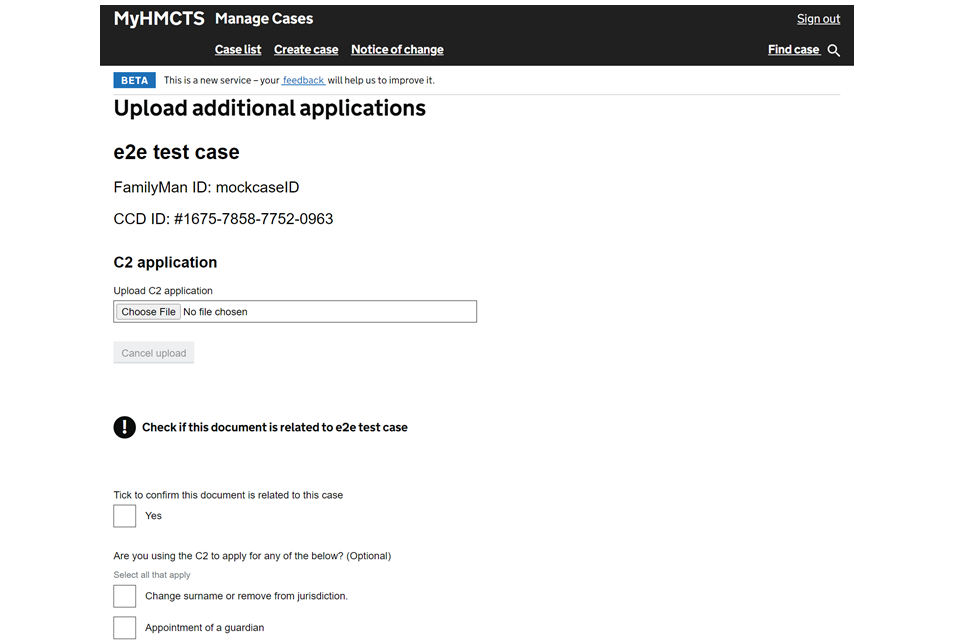
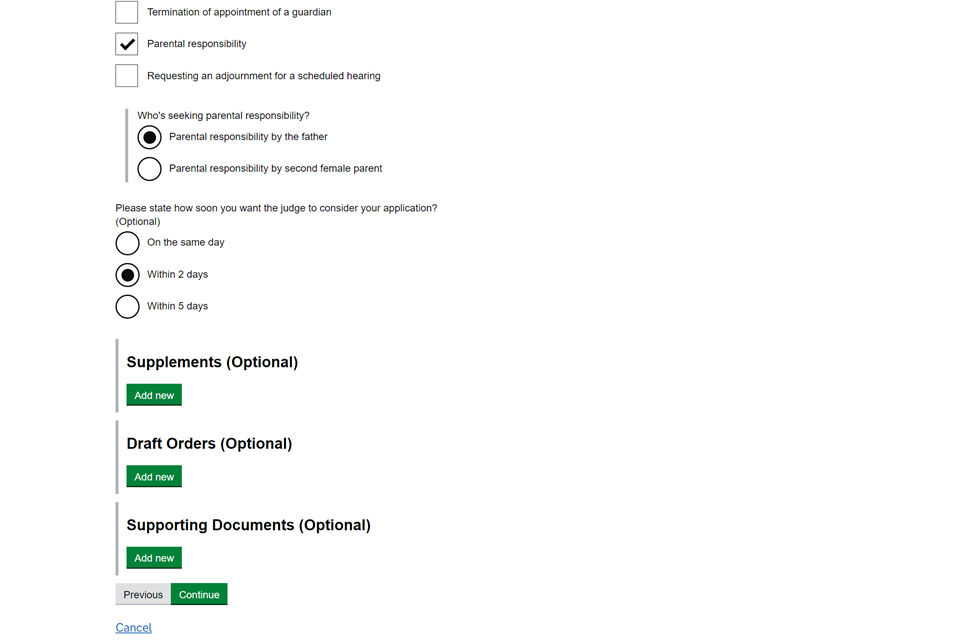
3. If making a C2 application, browse for and upload the application. Select any of the relevant check boxes below the question ‘Are you using the C2 to apply for any of the below?’ If you check ‘Parental responsibility’, select who is seeking responsibility. Then select ‘Continue’.
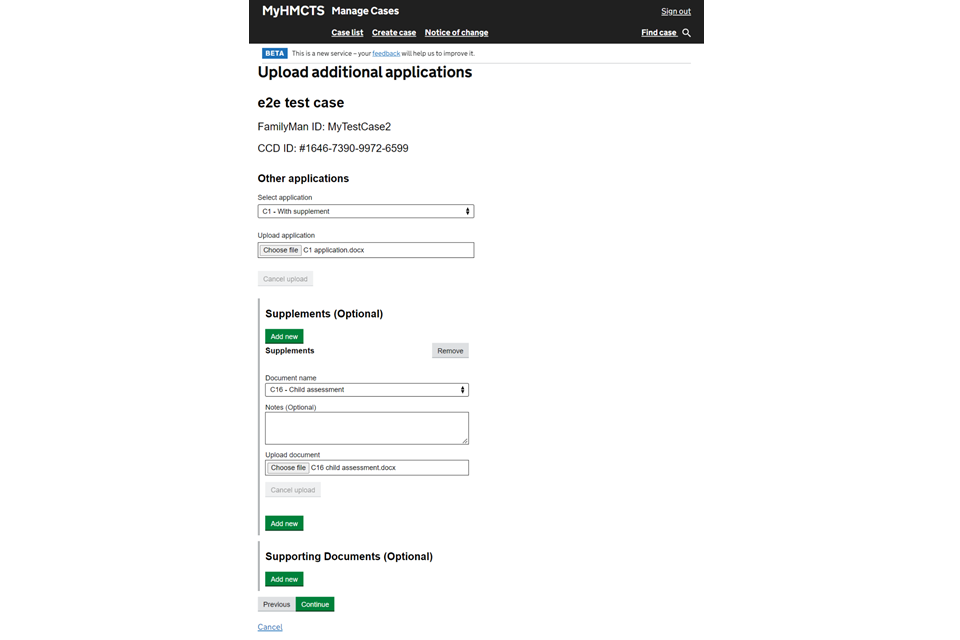
4. Select the type of other application you are making and upload the document. If you are making a C1 with supplement application, select the supplement name and upload the document. Select ‘Continue’.
5. If you are applying for an adjournment only, and the application was made 14 days or more before the scheduled hearing date, you will not be asked to pay. Your next screen will be to check your answers – go to step 7.
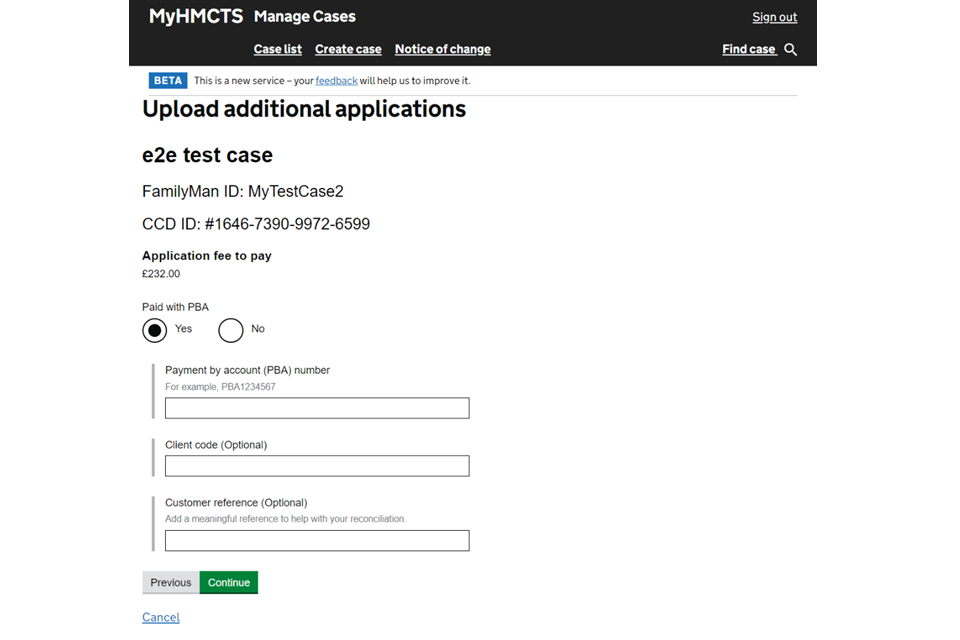
6. On the payment screen, select ‘Yes’ if you have a PBA account and complete the account details. Then select ‘Continue’. Only select ‘No’, if you do not have a PBA account – the court will contact you for payment
Make sure to complete the customer reference – this will help your finance team reconcile the account when they receive the invoice.
7. Check your answers are correct. If you need to amend any of the details, select ‘Change’ next to the appropriate detail. When all the answers are correct, select ‘Save and continue’.
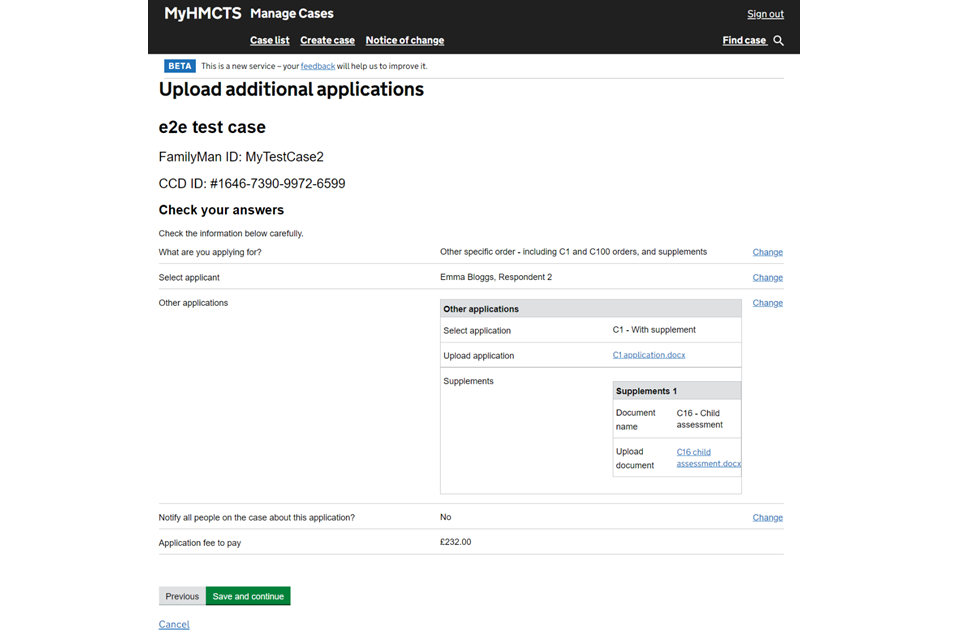
You will find the application in the other applications tab.
The service will notify the court and tribunal service centre (CTSC), who will refer the application to the allocated judge.
If you need to arrange for special measures at the hearing, you should contact the CTSC as soon as possible.
6. Add counsel
If you have appointed counsel (a barrister) from outside of your organisation, you must provide them with access to the case. This will allow them to:
- view the court bundle, documents and previous orders
- submit orders for approval to the hearing judge.
You must not use this option to add your own staff to a case. You must share the case with your colleague to give them this access – see the case administration guide.
1. Select ‘Add or remove counsel’ from the next step dropdown menu. Then select ‘Go’.
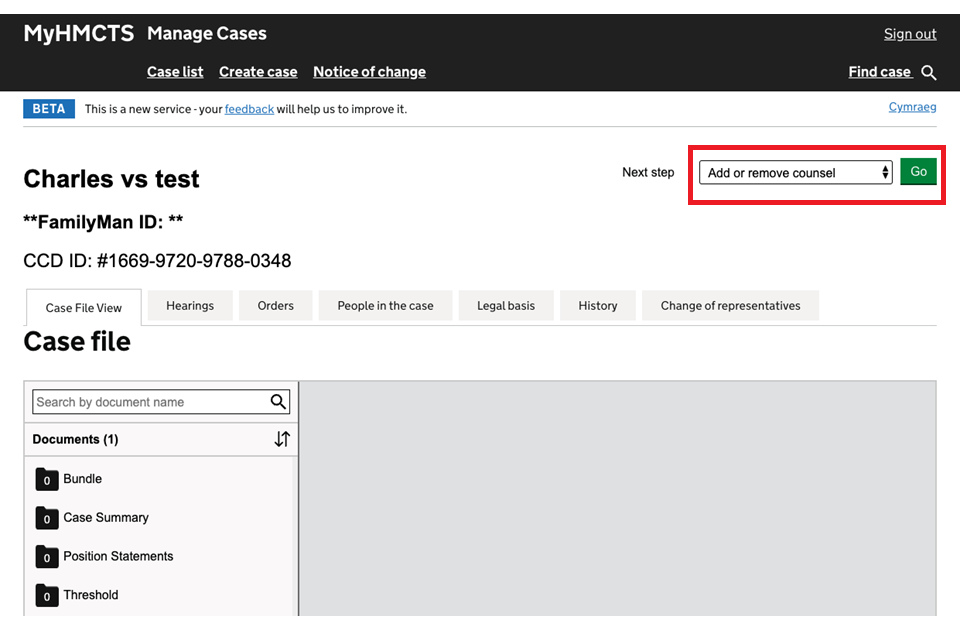
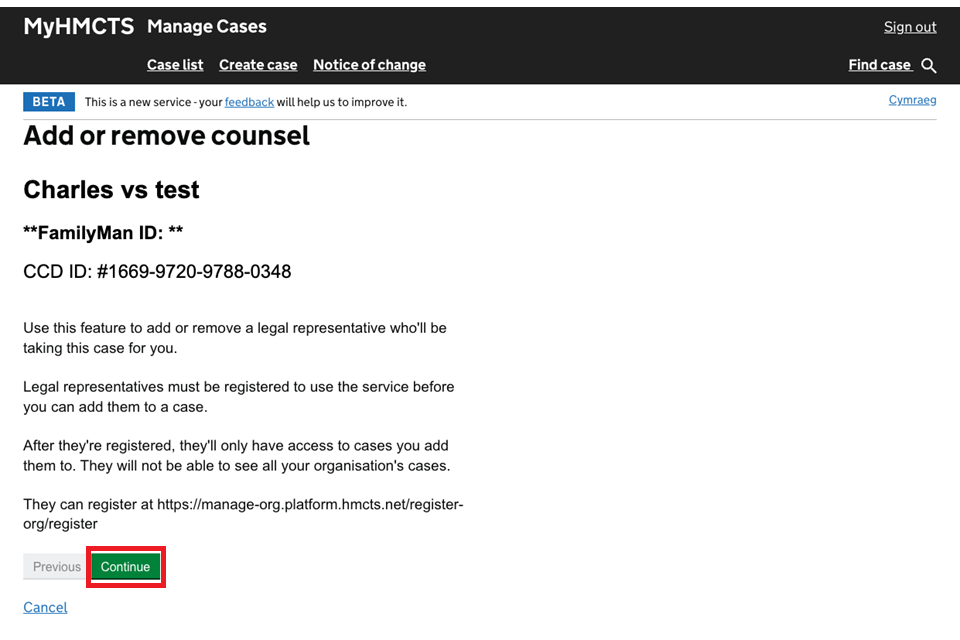
The next screen will explain that the counsel you are adding must be registered with MyHMCTS before you can add them. It includes a registration link, which you can share with them if they are not already registered.
2. Select ‘Continue’.
3. Select ‘Add new’ to add counsel’s details. If you need to add another person, select ‘Add new’ again and repeat. When you’ve added all the representatives you need, select ‘Continue’.
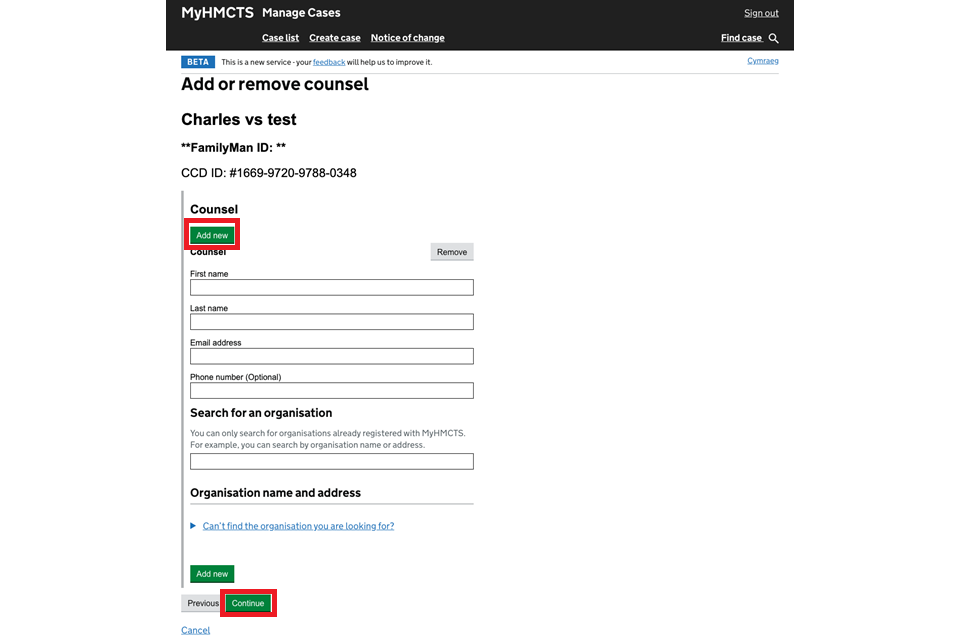
If the representative’s email address is not registered, you will get an error message. Return to complete this once the representative has registered.
4. Check your answers – if you need to make a change, select the relevant ‘Change’ link. When all information is correct, select ‘Save and continue’.
7. Add a colleague to the notifications
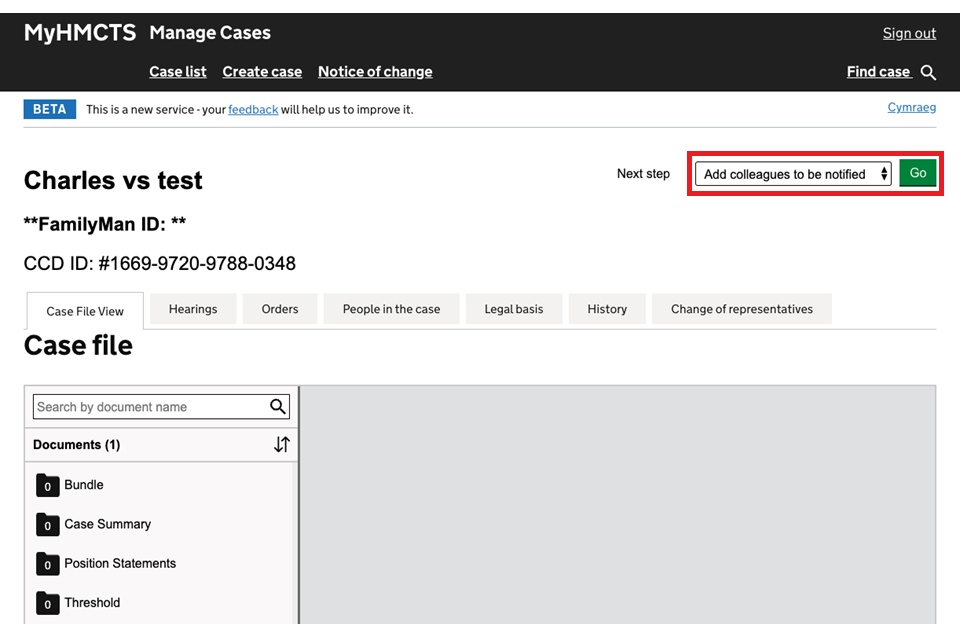
1. Select ‘Add colleagues to be notified’ from the next step dropdown menu. Then select ‘Go’.
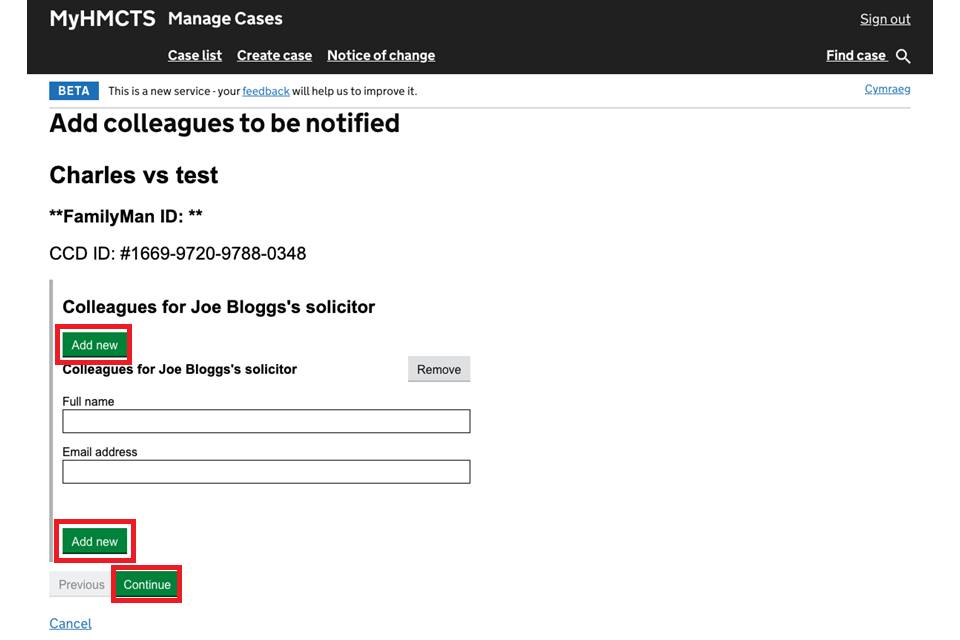
2. Select ‘Add new’ and add the name of your colleague and their email address. If you need to add another person, select ‘Add new’ again and repeat. When you’ve added all the colleagues you need, select ‘Continue’.
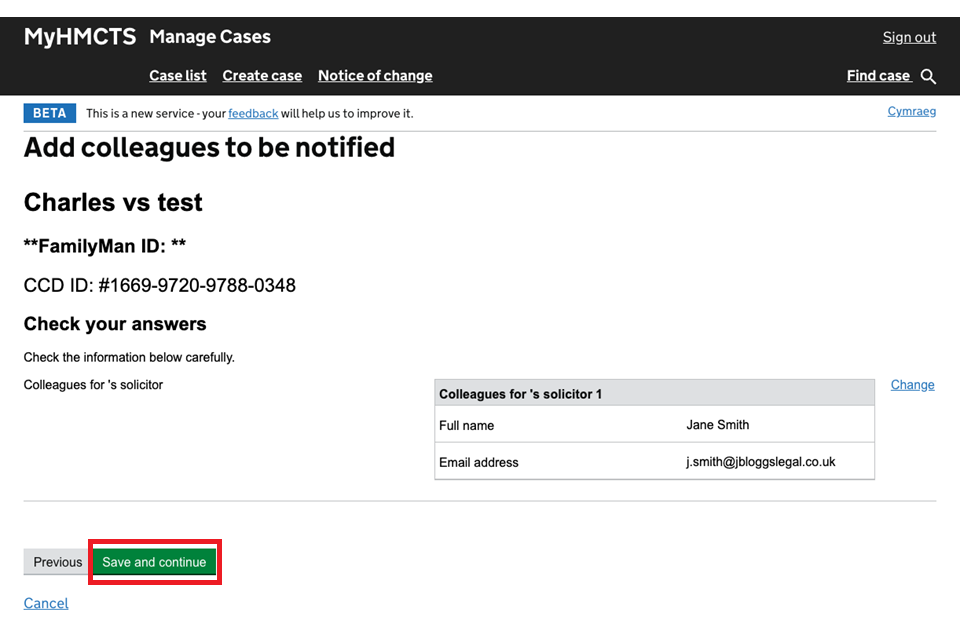
3. Check your answers. If you need to make an edit, select ‘Change’ to do so. If the information is correct, select ‘Save and continue’.
Your colleague will start to receive notifications. They will not be named on the case and they will not see the case in their case list. You must share the case with your colleague to give them this access – see the case administration guide.
4. To check the colleagues receiving notifications on a case, you can use the ‘Add colleagues to be notified’ function as in step 1.
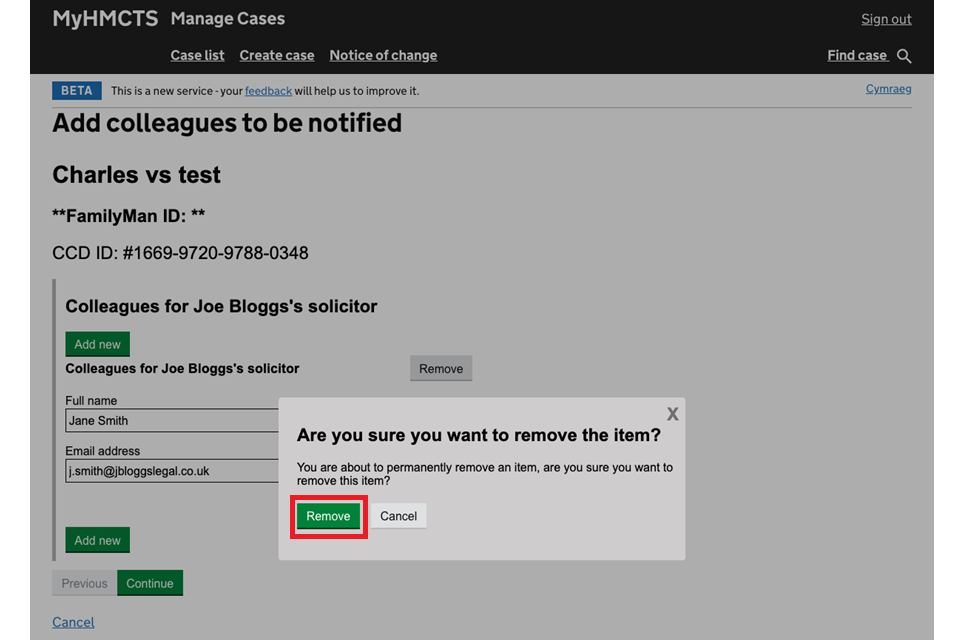
5. You can also remove a colleague here by selecting ‘Remove’ .
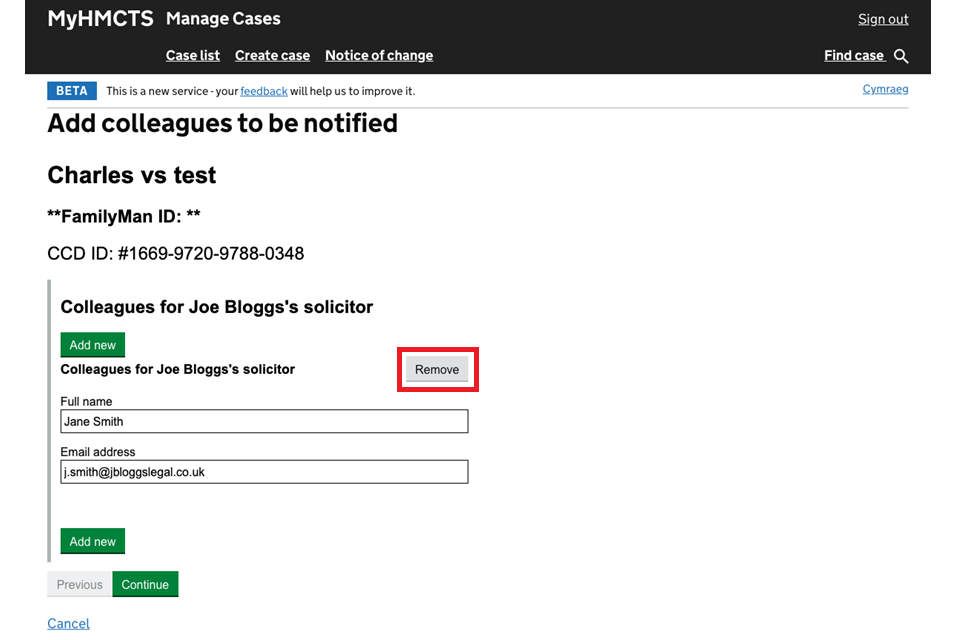
6. A pop-up box will ask you to confirm if you want to remove them. Select ‘Remove’ to confirm.
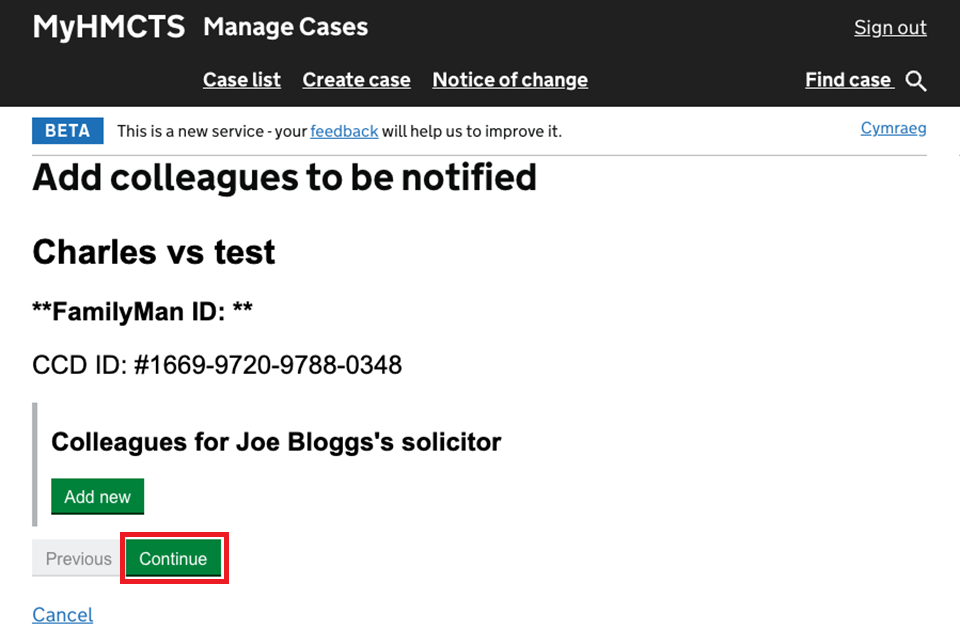
7. You will no longer see your colleague’s details listed. Select ‘Continue’.
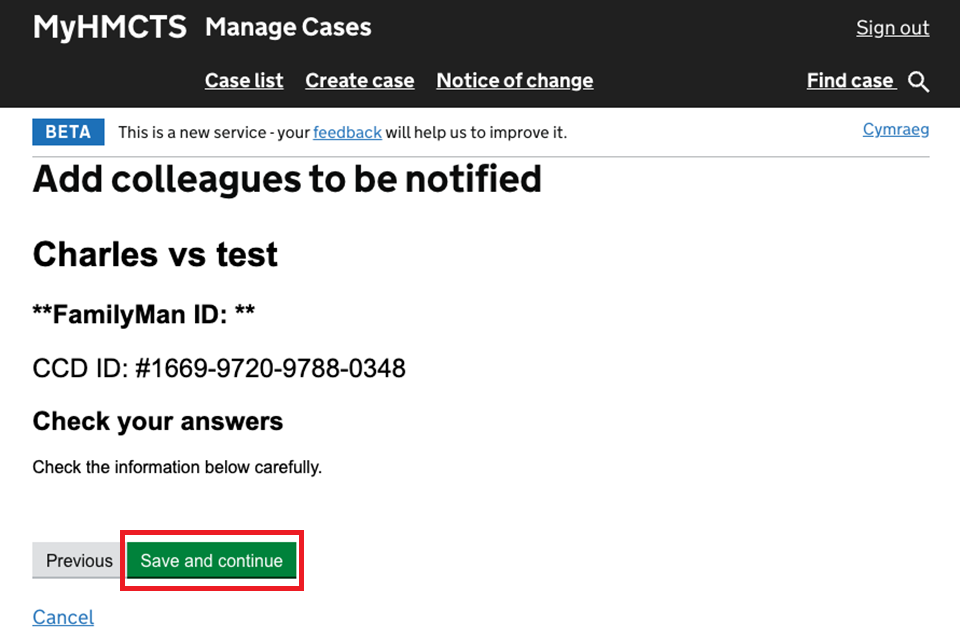
8. The check your answers page will show no details. Select “Save and continue’.
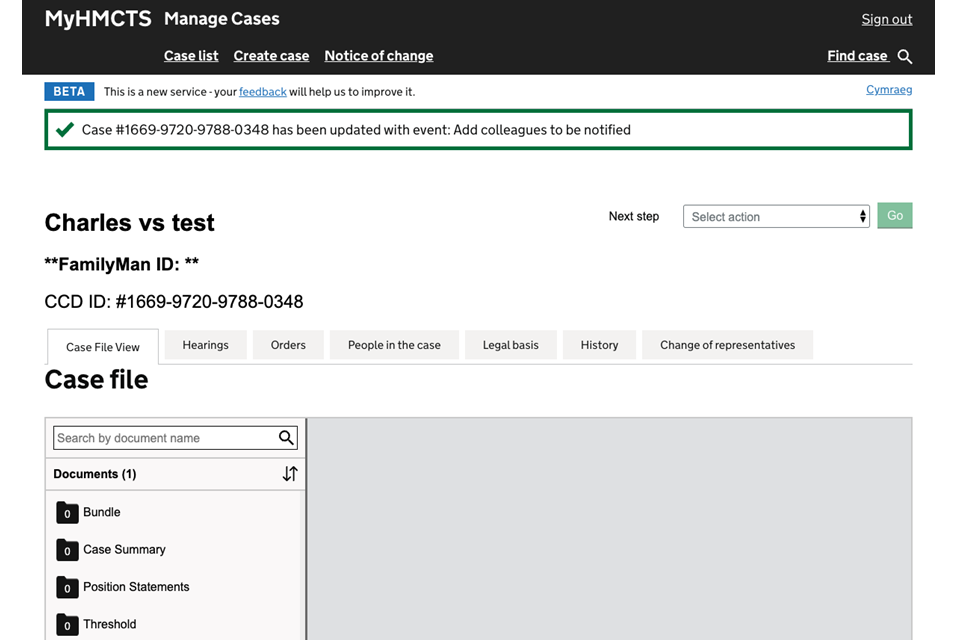
9. You’ll return to the case file view and see that the case ‘has been updated with the event: Add colleagues to be notified’.
8. Get help with MyHMCTS
Managing cases and case access in MyHMCTS
For help with technical issues using MyHMCTS to manage a family public law case, email FamilyPublicLawServiceTeam@justice.gov.uk.
For support or guidance on a case, email the court and tribunal support centre (CTSC) at contactfpl@justice.gov.uk or call 0330 808 4424.
Find guidance for case administration tasks in MyHMCTS
Accessing your MyHMCTS account
If you are having trouble accessing MyHMCTS, make sure you are using the correct link. To manage a case, you must use https://manage-case.platform.hmcts.net.
You should also make sure you:
- check your internet browser is up to date – we recommend you use Google Chrome or Microsoft Edge (you cannot use Internet Explorer or Apple Safari)
- clear your cookies and your cache
- check your firewall and security settings
We recommend that you bookmark or favourite MyHMCTS in your internet browser. You should only create the bookmark or favourite once you have signed in and are on the homepage. Do not create it from the sign in or verification pages, or while you have a case or organisation open.
If you are still having trouble accessing MyHMCTS, try using a different device to sign in.
If you have an IT support team, they will be able to help with any device, browser and security issues.
If you have an issue with your MyHMCTS account, you should contact an account administrator in your organisation.
If you need additional support with your MyHMCTS account, including with verification codes, email MyHMCTSsupport@justice.gov.uk. We aim to respond within 5 working days.
